Thursday, May 26, 2011

Chive Vinegar


The chive flowers have been blooming for about two weeks now.  They are such cheerful adornments for the garden.  Each year I take a division from the parent plant and start a new colony somewhere, even though one plant could easily go for three years between divisions.  It hasn't seemed to hurt the plants any to divide them more aggressively.


This spring I finally got around to plucking some of the flower heads to make chive vinegar.  I'd been meaning to do it for years, but good intentions got lost in the whirlwind of spring chores that must be done as soon as temperatures permit.  Had I known how gorgeous the infused vinegar would be I might have gotten to it sooner.  Look at the color!

For this infusion I used plain old distilled white vinegar, which, having no color of its own to begin with, probably helps the color given by the chive blossoms stand out so clearly.  If I'd had any of our own apple cider vinegar left I probably would have used that and not gotten so brilliant a shade.  I chose chive blooms that were just fully opened, still soft and with full color.  After the blooms have been open for a while they sort of stiffen up and the color becomes pale, before they begin to dry and turn brown.  I worked by feeling the blooms with my fingertips, checking for the right amount of give.  I washed them gently and spun them in a salad spinner, then pulled all the individual flowers off the flower head.  I got the same eye-stinging effect from doing this as I do when chopping onions.  Chive flowers pack a wallop!

I didn't use all that many blooms to my quart of vinegar - perhaps ten or so.  After just a week of steeping, the color and flavor of the vinegar is pronounced.  The flavor is oniony of course, but it lacks the pungent bite of raw onion; strong but mellow flavor is what we've got.  I'll strain off the spent blooms in another week or so, by which time I expect they'll have contributed all the flavor they've got to give.  I'm well aware that the color may darken and dull over time.  I've seen that happen with raspberry vinegar.  But I imagine the color will still be pleasant.  It seems to me, though I can't swear to it, that my chives sometimes bloom again later in the year.  If the color of this vinegar holds up well, or even for a few months, I may take cuttings from a late season bloom to make more chive vinegar.  If I can find pretty bottles at a rummage sale or yard sale, they would make nice gifts to give away for the winter holidays.  Whether the color holds up prettily or not, we'll be using this quite a bit in salads.

Monday, May 16, 2011

Early Snow Peas


Just a quick report on a successful experiment started early this year with snow peas (mangetout), one of my favorite vegetables.  Peas in general are quite hardy plants.  They even tolerate freezing temperatures, so they can be sown before the last frost of spring.  However, there's one little catch to this.  The pea seeds must have favorable conditions (meaning above freezing) to germinate.  If seeds are placed in the ground and never have suitable moisture and temperature for germination, they'll simply rot.  Once they've germinated, the seeds are as resilient to harsh conditions as the plants they will eventually grow into.

The neat trick is that germination can take place indoors.  All one needs to do is soak the pea seeds for about six hours in water to cover, and then drain them and wrap them loosely in a damp paper towel.  Keep the moist towel with the seeds in a plastic bag with plenty of air in it for 2 to 5 days, checking the seeds daily and rinsing them gently with fresh water.  You will see a pale little spur begin to swell under the seed coat.  Eventually this spur will break through the surface of the seed as a root, but you don't need or want to wait that long.  If the root emerges by more than a millimeter or so, you must handle the germinated seeds very carefully so as not to damage that root.  Far better to get them in the ground as soon as you can clearly discern the root forming up under the seed coat.

I planted pre-germinated snow pea seeds in my cold frame on the last day of January this year.  This was an audaciously early date.  But it worked.  The timing was chosen based on when we get ten hours of daylight back at our latitude.  (Ten hours of daylight being a critical minimum requirement for plant growth.)  I knew that all the growth from seed to emergent seedling would be fueled by the energy stored in the seed itself, not by photosynthesis.  Available sunlight during that time wouldn't matter, but our winter temperatures would slow down that phase of growth.  By the time the seedlings poked their heads up above the soil sometime in mid-February they'd have sufficient daylight to continue their growth so much as temperatures would allow.  Though the cold frame only has about 8 inches of headroom, I figured by the time the snow peas were of a height to make that an issue, it wouldn't be necessary to keep the cover on the cold frame any more.  That's exactly how it worked out.  The variety I grow, Snow Sweet, doesn't even require trellising, so it's perfectly suited to being started in such a small space.

The picture above is what our snow peas look like today.  I got our first small harvest off of them last night, half way through May, roughly 3-4 weeks early for this area.  Typically snow peas peter out once the temperatures get too warm.  I suspect these plants will continue to produce through June and possibly even into early July, depending on the weather.  We're planning to build a small hoop house this year, which will provide more sheltered growing space than our cold frames, and greater temperature gain as well.  These advantages should afford us snow peas even earlier in the season.  My plan is to sow germinated snow pea seeds progressively through late winter wherever carrots or other crops are removed from the hoop house beds.  I think I could eat snow peas every day of the year and not get sick of them.  Maybe by this time next year we'll be testing that theory.

If you want to nudge the boundaries of the possible with plants on your own property, you can figure out the daylight calculations for your own latitude here. You'll need a fair degree of precision in your latitude values.  You can get that by looking up your address on either google maps, or google earth, by the way.

Wednesday, May 11, 2011

Five Garden Favorites

Deanna over at Crunchy Chicken has a post up about her top five picks among edible garden plants.  I was going to just respond to her post in a comment, but then I decided to flesh the material out just a bit and make it a post of my own.

Deanna's number one favorite plant is garlic, and I can't possibly disagree with this.  Garlic has been utterly trouble free for me in all the years I've grown it.  It's a staple of our diet, it stores well in our root cellar, and when we grow the rocambole varieties, we get garlic scapes as a bonus crop.  Garlic also fits neatly into a busy gardening year.  Harvest comes in late June or early July - just when the spring planting is done and before the onslaught of tomatoes and other crops really start to become management issues.  I did a write up of my garlic planting technique a few years back.  I don't know if it's the technique that gives me such great garlic crops, or if all my efforts are superfluous and the garlic would do just as well on its own.  But it sure is one of my favorites to grow.

A less obvious pick for my number two is asparagus.  Even though there's very delayed gratification with asparagus (as with many perennial plants), it's still a favorite.  Once you get past the minor hassle of planting, it's unfussy, produces for 15-20 years, and is sooo delicious. It gets bonus points for being an early spring crop.  This time of year we're desperate for homegrown foods, and asparagus plugs the gap.

Culinary herbs definitely make the list, especially the perennial ones.  I like anything I can plant once and harvest many times.  But even the annuals will often self-seed, as the cilantro from last year has done.  Herbs can be grown by just about anyone, whether you have access to a bit of earth or not.  They're also completely unfussy once established (are we noticing a trend here?)  Plus, growing my own herbs saves me a lot of money, since herbs are among the most expensive produce at a market.  Many of them dry well.  Cooking without herbs would just be boring, so I'd probably want them around even if they were more difficult to grow.  And if you really get into culinary herbs, you can continue the adventure by exploring the medicinal uses of them too.

Potatoes have to be on my list.  They are one of the very few calorie crops that grow reliably in my area.  They almost certainly will grow reliably in your area too.  Potatoes are adaptable to many climates, and as I found out two years back, even if the dreaded late blight hits there is a means to salvage a crop.  While there are tales of prodigious yields on potatoes, as much as 20x or 30x the weight of the seed potatoes planted, these remain for me an El Dorado.  I've been content with my 10-15x increases.  Even in a truly bad growing year I've seen 5x. Beyond their adaptability as plants, potatoes are incredibly versatile as foodstuffs.  There are so many ways to prepare and eat potatoes, and they're all delicious.  If you choose the right varieties to grow, they store very well.  They're no slouches in the nutrition department either.  As I learned in Carol Deppe's The Resilient Gardener, potatoes are also surprisingly high in both protein and vitamin C. 

Even though the urban legends about zucchini (courgettes for you British - or French - types) being left on doorsteps in the dead of night are legion, it still makes my top five list.  Mind you, you only need one zucchini plant if your family members number four or less.  Zucchini is incredibly productive, so growing too many plants is a recipe for stress if not trauma.  I love growing zucchini because it is just such an exuberant plant.  It doesn't ask much, and if you get a bush variety, it won't even take up that much space.  My plant always gets powdery mildew, and eventually, squash bugs.  But it carries on gallantly, producing until mid-summer.  Frankly, by then I'm quite content to let it go and move on to eating other crops.  Until that point there are just so many wonderful uses for zucchini: stir-fries, grilling, bi bim bap, and of course, morning glory muffins, zucchini bread, and chocolate cake.

So what about you?  What are your favorite crops to grow in your garden?

Monday, May 9, 2011

News of the Flock

It's been a while since I posted anything about our backyard flock.  So some parts of this update could not in fairness be called news.  But it's news on the blog, so probably worth a post.  If you're a newish reader, or just want an overview of our mobile coop and pen system for our laying flock, I wrote about it in detail in this post.


Last fall we did some minor upkeep to the mobile pen with help from some WWOOF volunteers.  The half of the roof that consists of plywood had pretty well rotted, so it was replaced.  It and the rest of the pen got a wash of primer, and then the remainders of all the paint samples we had lying around were used to give the pen a piebald, hickish sort of charm.  At least the colors are bright and cheery.  We figure we'll get one, maybe two more years of service out of the pen (first built in spring 2008) before we need to build a new one from scratch.  While I don't relish the work of building anew, it will at least be a chance to build smarter.  The pen definitely does its job, but it's much heavier than I would prefer.  I'd like to build something lighter that will be easier to move each day.

I got tired of the difficulty of cleaning out the mobile coop, so I've instituted a few changes there too.  For one thing, the screened floor of the coop never worked well in allowing the manure to fall through onto the ground.  The hay from the nesting box would get spread over the floor and catch the poop, so it was just one big mess, not at all easy to clean.  This year I cut a piece of corrugate plastic to fit over the entire floor, including under the nesting box.  When it's time to clean out, it's now much easier to just take down the nesting box roof, and pull it out along with the plastic on the floor.  That accounts for about 98% of all the poo in the coop.  The plastic can be hosed off, exposed to a few hours of solar radiation, and replaced in the coop.


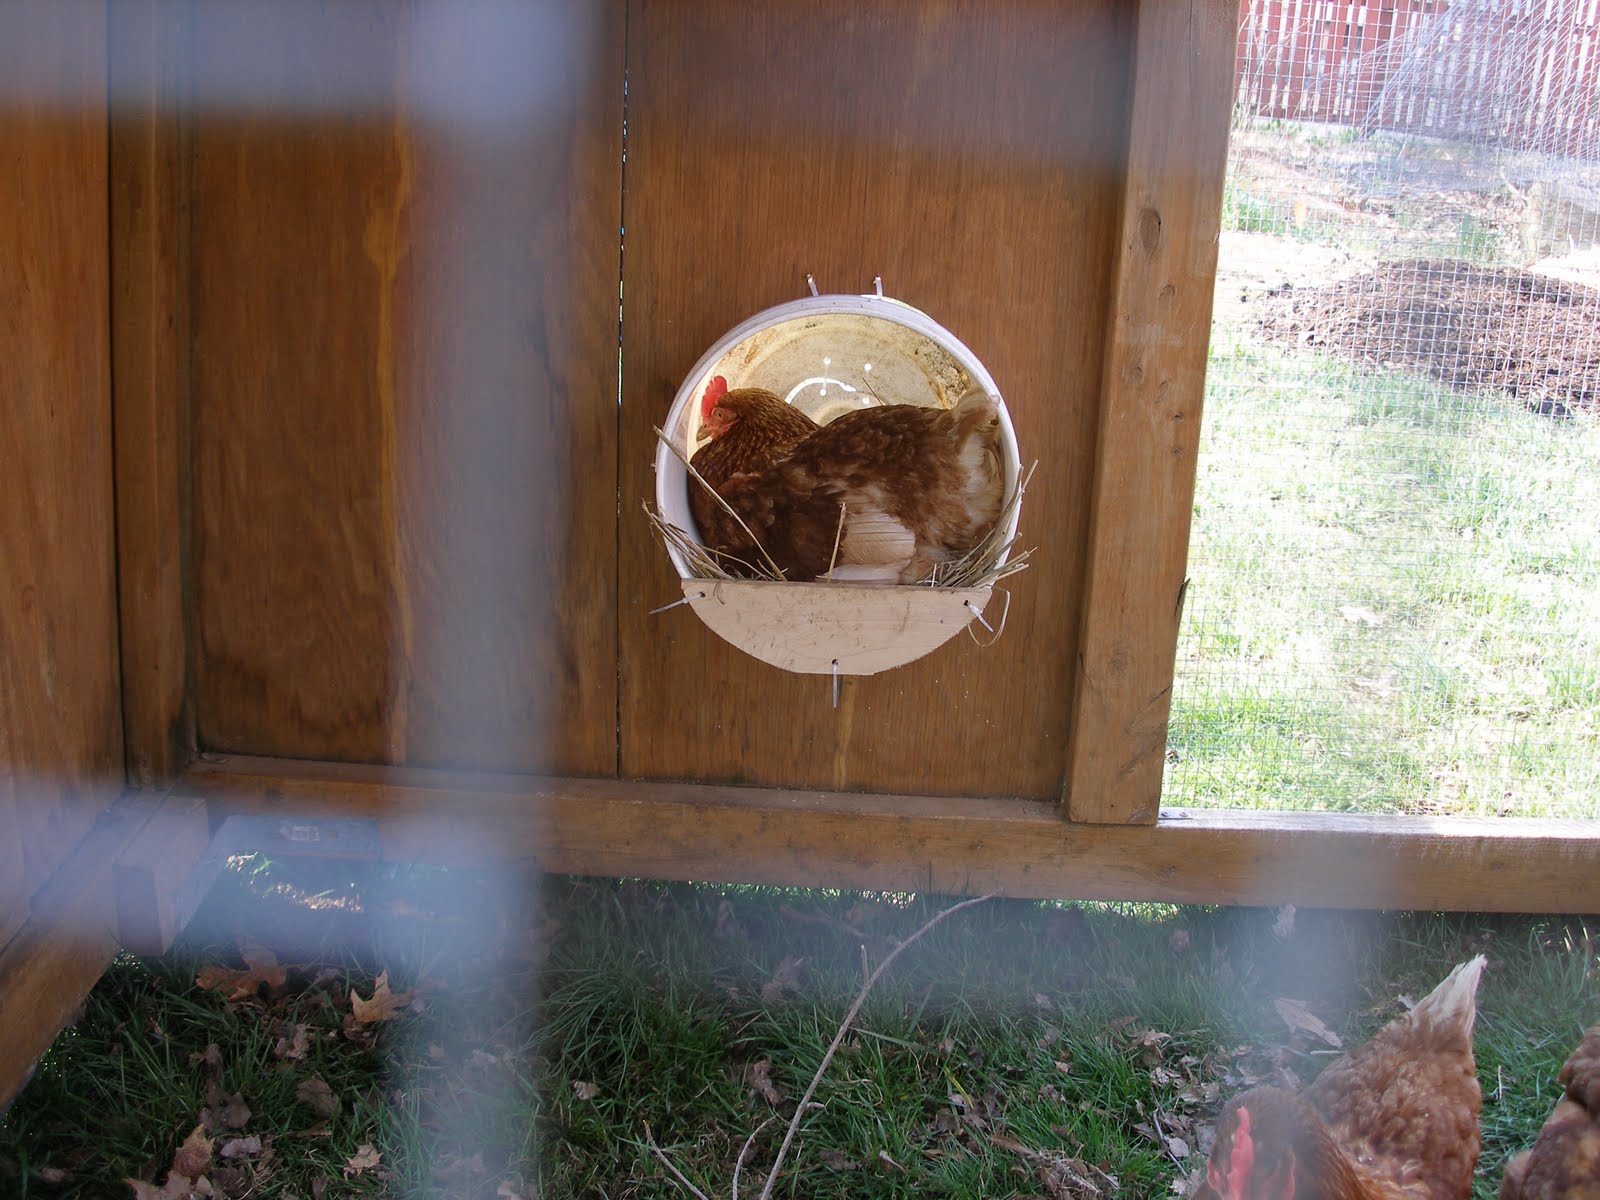
The second change is that I now close the coop up during the day.  Once the girls come out into the pen for their breakfasts, they're out all day.  This achieves a couple of things.  Firstly, there's a little less poop in the coop, which means less for me to deal with at cleaning time.  More poop ends up on the lawn where I don't have to do anything with it.  (Though to be perfectly honest, this effect is small since chickens seem to do most of their pooping overnight from the roost.)  The other benefits are to do with the eggs.  I no longer have to squat down to check the nesting box in the coop.  Instead I mounted a new nesting box in the pen, based on the bucket nesting box they used in their winter quarters in the shed.  I can check this nesting box easily without physical strain.  I know I sound like a total wuss when I say this, but it's long-term thinking.  Both of my parents have had joint replacement surgeries, and I want to be able to keep chickens well into my dotage.  So designing now for physical ease is important to me.  Eggs laid in the bucket nesting box also tend to be cleaner, since the hens are no longer walking through a manure-y coop to get to the nesting box.


As alluded to in an earlier post, we just added two Cuckoo Marans hens to the flock, bringing our total up to six laying hens.  These are very different birds from our Red Stars.  The various Marans breeds are all dual-purpose, meaning they put on some meat, and lay some eggs.  In terms of feed efficiency, they don't put on meat as well as dedicated meat breeds, nor produce eggs as well as dedicated layer breeds.  They're significantly bigger than our Red Stars, and assertive too in the ways of chickendom, which is to say rather mean.  The Red Stars laid eggs with bleached looking eggshells for a few days - a typical indication of stress.  Now the pecking order has been established, and the Marans clearly rule the roost.

I briefly kept a small flock of White Marans before, and wasn't impressed enough with them to keep them long.  The Cuckoos have a couple of advantages on the Whites we had before.  They're younger, so they are laying better than the older whites.  And they cohabitate with the Red Stars, who demonstrate to the Marans that all the weeds and greenery I throw into the pen are good to eat.  Thus, the Marans learn behavior that improves the quality of their eggs and reduces my feed costs.  The person I got the Marans from is a hobby breeder for show.  I don't think he cares much about feed efficiency or egg quality.  His birds had been kept in stationary runs denuded of vegetation, so there wasn't anything for them to forage.  Still, he gives me free hens, so I'm not going to complain.  With a little tutelage from the Red Stars, they seem to be learning to appreciate the weeds.

While the Marans were free, there's a downside to them.  They're too big to easily fit in the bucket nesting box, which is a snug fit for the Red Stars.  One of them managed to lay one egg in the bucket, but the rest of the time they've deposited their eggs in the grass.  It would be a good idea to add another nesting box just based on the numbers alone.  A bigger nesting box could fit alongside the one we've got.  I just need to figure out what could be used to provide more space while not adding too much additional weight to the pen.  Meanwhile those extra dark Marans eggs lying around on the grass tell me that the worst of the egg-eating tendencies the Red Stars exhibited in February are apparently over.

I don't expect that we'll keep the Marans all that long.  Right now they're quite young and thus in their prime so far as egg laying goes.  They're laying decently.  As soon as their production tapers off a bit, we'll slaughter them and convert them to canned meat and chicken stock.  By then it may be time to replace the Red Stars with some fresh pullets as well.  We are running perilously low on chicken stock at the moment.

Having recently scrounged a large plastic storage bin that would be suitable as a brooder box for chicks, I'm now considering raising a few meat birds for the freezer over the summer months.  I'm not at all sure that this is going to happen, but I'm mulling it.  If we decide the project is a go, there will certainly be a few posts on the topic.

Thursday, May 5, 2011

First Tincture: Valerian Root


Events around the homestead are running far ahead of posting, as is so often the case in spring.  A lot has been going on what with the installation a new package of Italian honey bees, and the addition of two Cuckoo Marans hens to our tiny backyard flock.  (Yes, I know that Cuckoo Marans sounds like a stripper's name, but it's a breed of chicken, trust me.) Add more transplanted stinging nettles, and ramps, and rootstock, plus potatoes still to be planted, and it's a bit of a whirlwind.  Blog-worthy stuff seems to just be slipping right past me these days, so I decided to seize upon one of them and just get a post out already.

Learning more about herbal medicine made my official list of goals for this year.  Last year I planted a good selection of the more widely available medicinal herbs.  Over the winter I picked up a few titles on the subject and dipped into them from time to time.  And finally today I've made my first effort towards creating a medicinal tincture.  I'm really hoping I just picked one of the more difficult ones, because it was rather a tedious chore: valerian root.  I planted three valerian plants last year, and spring of the second year is the latest time to harvest the roots.  I could only bear to dig one of them up; I'm hoping the other two will set seed and propagate themselves so I can harvest some of those next year.  You see, to make a tincture from the root of the plant is to kill that plant.  That's hard for me.  Beets, carrots, parsnips and turnips are one thing, but perennials are another.


That's one excuse anyway.  An equally good excuse would be that valerian roots are an absolute pain to clean.  Here's a picture of what it looked like after 20 minutes of hosing off outside, before I tackled the rest of the cleaning inside. It's much like being hairdresser to a sheepdog.  A very dirty and tractable sheepdog.  The digging took only a couple minutes.  The cleaning took at least an hour.  Other medicinal tinctures are going to have to be less work if they're going to get made.  Fortunately, once the roots were clean enough to pass muster with me, there was very little else to it.  I simply cut them up with kitchen shears, packed them very tightly into a clean canning jar, and poured over enough 80 proof vodka to cover.  If I'd had 100 proof vodka on hand, I would have used that.

For the next several weeks the tincture will stay in a kitchen cabinet where I'll see it and remember to shake it every other day or so.  After that it'll be strained and stored in the pantry where it will keep forever, or until it's used up. We'll see how diligent I am about making use of all the other medicinal herbs we've got around here.  If it can be justified, eventually it may make sense to stock up on a case or two of 100 proof.  One is inevitably drawn to wonder if it's the herb in the herbal tinctures which lends the efficacy, or is it the alcohol itself?  Valerian is known as a powerful sedative, but for a lightweight like myself, so is vodka.

Valerian root has a pronounced smell which some people apparently find extremely unpleasant.  I sort of like it.  It's strong but not overpowering.  I would describe it as somewhere between mossy forest and licorice.  My cat found the scent of it on my fingers incredibly fascinating just after I finished making the tincture.  I don't think this will be a tincture I've got to hold my nose to take.  At least I hope not.

Oh, and if you're an herbal medicine whiz and feel compelled to tell me I was too late with harvesting my valerian root, please save it.  Tell me in a month or so, if you must.  Today the effort is just too fresh in my mind to learn that it was all wasted.  On the other hand, if you're still an herbal medicine whiz and you have some nifty trick for cleaning valerian root, or any other herbal medicine tips you feel generous about, pipe right up.